Showing posts with label bread. Show all posts

Tuesday, January 15, 2013

Bagels


Hi! I made bagels. They were round, and had a hole in the middle. See?


Just like a bagel should be. And it wasn't even too difficult! I followed the recipe in Peter Reinhart's The Bread Baker's Apprentice. Sure, there were a couple specialty ingredients, such as malt powder

I got this stuff from my local beer brewing store.
and high gluten bread flour, such as King Arthur brand, but all in all, the recipe is pretty straightforward. 

These bagels have a pretty crusty crust, and a dense and chewy crumb. I recommend eating them.

The recipe takes 2 days. The first day is pretty involved, but you only need an hour or so on the second day. According to Reinhart, allowing the dough to ferment slowly overnight allows it to develop deeper flavors. to get maximum flavor, this recipe uses both a sponge and overnight fermentation. 

The quantities listed will make 12 standard sized bagels

Ingredients:

Sponge
  • 1 tsp instant yeast (none of that old fashioned active dry stuff)
  • 510g / 18oz / 4 cups high gluten bread flour (It is generally better to measure flour by weight or mass rather than volume, because flour density is very variable.)
  • 2.5cups water
Dough
  • 1/2 tsp instant yeast
  • 482g / 17oz / 3.75 cups high gluten bread flour
  • 2 3/4 tsp salt
  • 2 tsp malt powder
To Finish
  • 1 tbsp baking soda (although this quantity doesn't mean anything because Reinhart does not specify the amount of water to dilute it in...)
  • toppings: sesame seeds, poppy seeds, rehydrated dried garlic/onion, cheese, salt, etc... 
    to rehydrate, just add water!
Method (slightly simplified from the original):

  1. Mix together the "sponge" ingredients, the dough should look like pancake batter.
  2. Let the sponge sit, covered, at room temperature for 2 hours (until it is foamy and bubbly and has doubled in size.)                                          
  3. bubbles!
  4. To the sponge add the "dough" ingredients. Stir well with a spoon or your hands to form a coarse, shaggy dough. 
  5. If you are kneading by hand, turn out the dough onto a floured surface and knead for 10 minutes. If you have a stand mixer, have the machine knead the dough with the dough hook for 6 minutes.   Either way, the dough should be "satiny and pliable, but not sticky" (Reinhart).
  6. Divide the dough into 12 pieces (each about 128g / 4.5oz). Cover with a damp towel and allow to rest 20 minutes.
  7. To make the bagel shape, poke a hole into the center of a piece and shape the dough into an even bagel shape. The hole should be about 1 in in diameter. 
  8. Line 2 sheet pans with parchment paper, and place the raw bagels on it. Let the dough sit for 20 minutes, then put it in the fridge overnight or for up to 3 days. 
    transporting bagel dough
  9. The next day, preheat the oven to 500F and bring a wide pot of water to boil. Add the baking soda to the water.
  10. Take the bagels out of the fridge and drop a couple of them into the water (only as many as can fit comfortably on the surface of the water)
  11. Boil the bagels for one minute on each side. 
    boiled bagels
  12. Sprinkle the baking sheets with semolina or cornmeal and place the boiled bagels on it. Top the bagels with desired toppings (I like sesame+poppy+garlic.) Note: to prevent the garlic from burning, you need to soak it in a bit of hot water to rehydrate it before using.
    toppings!
  13. Bake the bagels for 5 minutes at 500F, rotate the pans and bake until golden, about another 5 minutes.
  14. Let the bagels cool for 15 minutes on a cooling rack. 
    Om nom nom
  15. Slice the bagel open, and spread with cream cheese! 
    No bagel is complete without cream cheese.
     
  16. Cheese on top is also good.

Saturday, June 23, 2012

Garlic Bread


... is basically at the top of the list for foods both delicious and quick to make. I mean, who doesn't like garlic bread? (Many people, I am sure, especially those who dislike garlic.) But I cannot resist the warm combination of fresh crusty bread, melted butter, and garlic.
Of course, like all inherently simple things, there are many different recipes, each claiming to "be the very best" (that no one ever was??) My suitemate, for example, simply kept a bowl of garlic-butter on the counter (for some reason unrefrigerated) and whenever he wanted garlic bread, he would spread a thick layer of butter on a slice of sandwich bread and microwaved it until the butter was melted. I must say, it was delicious. Some people put cheese or zest or their garlic bread, which is delicious too. The main debate I have seen is olive oil vs butter. But hey, this recipe uses both, so anything is possible.I am personally a fan of butter garlic bread, probably because I am a fan of butter.

But why am I talking about garlic bread anyways? Well, the other night we had family friends come over for dinner, and my parents (Hi parents!) basically assigned me to make the dinner they had planned: clams and fish cooked in a tomato-chorizo-roasted red pepper-garlic-onion sauce and garlic bread.
So how did I make this garlic bread? Well, I opted for the "melt butter with garlic and brush/pour on top of the bread" method.


Garlic Bread (serves 6-8)

Ingredients

  • 1 baguette
  • 3 tbsp of salted butter
  • 4 medium garlic cloves
  • Parsley (opt)
Tasting the melted garlic butter :)

Method:
  1. Cut the baguette in half to make 2 short baguettes
  2. Cut each of those in half like you are splitting them for a sub sandwich. The goal here is to have have access to the crumb of the bread.
  3. Use a garlic press or knife to mince the garlic and place it in a small microwaveable bowl.
  4. Add the butter to the bowl and microwave the contents until the butter is melted and bubbly.
  5. Use your communism skills to distribute the melted garlic butter evenly among the pieces of bread (on the not crusty side). 
  6. Sprinkle on a bit of chopped parsley if you want to.
  7. Slice the bread into the number/size of pieces you desire.
  8. But the bread pieces crust down on a baking sheet and stick under the broiler until the edges of the bread brown.
  9. Serve warm!

Sunday, March 18, 2012

Spring Break 2: Bread-y stuff

So on Thursday I pulled out my beloved The Bread Baker's Apprentice by Peter Reinhart and made some bread. I made a caprese-inspired loaf by putting fresh mozzarella, sundried tomatoes, and basil in Challah dough (I'm sure this is terribly sacrilegious) and pizza.

For the Caprese Bread I made the challah dough per the instructions of Peter Reinhart. To incorporate the filling into the dough, I stretched out the dough like pizza, placed the filling on top, and rolled it up like a log. 

And then I split it into 3 and braided it!


I also made pizza dough (also from Reinhart's book) that I rested in the refrigerator overnight. As toppings for the pizza, I roasted some brussels sprouts and broccolini in a 400 degree oven for 20 minutes, then I turned the oven down to 330 for another 10-20 minutes. For sauce, I blended some canned diced tomatoes and cooked them with onions, garlic, and oregano.


I made 3 pizzas, one with brussels sprouts, broccolini and caramelized onions (not pictured), one with broccolini, copa, and caramelized onions (first), and, at my dad's suggestion, one with chorizo, brussels sprouts, roasted garlic, and an egg in the center (second). The chorizo one was the family favorite!


 And on Pi day (3/14) I visited my friend and we made pie!!! (We did not have enough crust dough to make a complete top crust, so we put a circle on top instead! It is off center on purpose.)


Monday, September 28, 2009

Pizzadventures!

I'm back! After almost three months of silence, I am writing today.
Lately, in the past month or so, I have been making quite a bit of pizza. Here are photos:

This is the book that gave me the recipes for the doughs. I got it at Williams-Sonoma

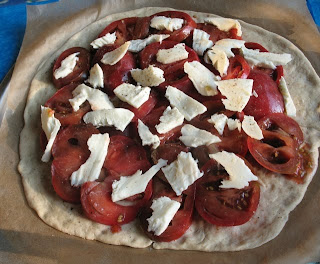
This is a Pizza Margherita: Tomatoes, Fresh Mozzarella, and Basil-> The colors of the Italian flag! Unfortunately, I put too many tomatoes, and the crust was soggy.


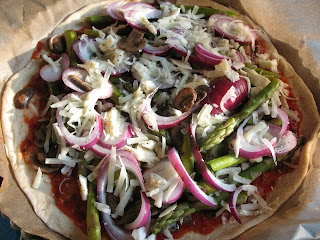
This pizza has asparagus, mushrooms, red onions, Manchego Cheese, and tomato sauce. I cooked the mushrooms and asparagus a bit before putting them on the pizza.


This pizza is a variation on the Margherita with red and green heirloom tomatoes, basil, pre-packaged mozzarella, and roasted garlic. This one was not soggy.

Me attempting to stretch out my dough the cool way.


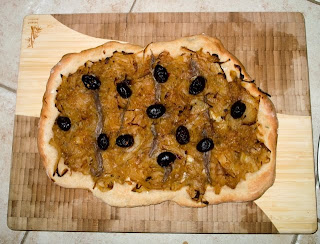
A specialty from Southern France: Pissaladière. Lots of Caramelized onions with Anchovies and Olives. The anchovies are really a must if you ever make this.

This pizza was topped with Broccolini (Microwaved a few minutes before topping,) Marinated red peppers (in balsamic vinegar, olive oil, and oregano,) Cherry tomatoes, a couple of Brined pearl onions my dad bought, Tomato sauce, and Cheese.


So, those were my Pizz-Adventures. You can use pretty much any bread dough recipe for the crust, and the topping possibilities are pretty much endless.
(If you have 10 possible toppings for a pizza, how many distinctly different pizzas could you make if you must take equal amounts from each topping you choose? Now that would be 10C1+10C2+10C3...)

Unleash your inner pizzaiolo.

Sunday, April 5, 2009

Naan (Indian Flatbread)

I don't know if I've told you this already, but I eat a vegetarian dinner once a week (I also eat vegetarian lunches almost every day). So, during spring break, I decided to make an Indian meal with vegetable curry and homemade naan.
Naan is a type of Indian flatbread that is traditionally baked in a tandoor, a beehive-shaped oven that can reach scorchingly high temperatures. Since I, like most people, do not own a tandoor, I decided to look for a recipe adapted to the typical American kitchen. I found one in the newest Spring Entertaining, by Cook's Illustrated magazine.

The recipe was not to complicated, and made naan thattasted just like the ones I get from Indian restaurants. Rather than baking them in the oven like most American adaptations, it called for cooking the naan in a cast-iron skillets on the stove to simulate the one-sided high-heat of tandoor. The disadvantage of this was that I had to cook each loaf one at a time, but according to the magazine, using the oven resulted in dry and tough bread. It also instructed to brush the finished naan with melted butter or ghee, but I decided not to.

Naan (from Cook's Illustrated, makes 8 6"-7" naan)
Ingredients:
  • 13 1/2 oz (2 1/2 cup) bread flour
  • 1 1/2 oz whole wheat flour
  • 1 package instant/rapid-rise yeast
  • 2 tsp. sugar
  • 1 1/2 tsp salt
  • 1 cup water (I used more)
  • 1/4 cup plain yogurt
  • 1 tbps olive oil + extra for bowl
  • 3 tbsp sesame seeds (opt)
  • 4 tbsp butter, melted (I didn't)
Instruction:
  1. Combine flours, yeast, sugar, and salt in bowl of stand mixer and mix with paddle attachment until blended.
  2. Add water, yogurt, and oil and mix on low speed until shaggy dough forms, about 30 sec, adding more water in 1 tbsp increments if necessary.
  3. Replace paddle with dough hook and knead on medium speed until smooth and glossy, about 8 minutes, adding more flour if necessary (one tbsp at a time), to allow dough to clear sides of bowl but stick to very bottom.
  4. Transfer dough to clean work surface and knead by hand 1 minute.
  5. Shape dough into ball, transfer to lightly oiled large bowl, cover w/ plastic wrap, and place in draft-free spot. Let rise 45 minutes to 1 hour (Until dough has doubled in size)
  6. Transfer dough to unfloured work surface, cut into 8 equal portions, and roll each into a ball using a cupped palm and the friction of the work surface.
  7. Let balls rest 5-10 minutes.
  8. Using a floured rolling pin, roll each ball into 6-inch circles (add sesame seeds on top if using.)
Cooking:
  • Heat a heavy skillet (I used an iron tortilla pan) over med-high heat until hot, about 5 minutes (no oil).
  • Working with 1 piece of dough at time, left dough and gently stretch about 1 inch larger, and lay in skillet.
  • Cook until dough starts forming bubbles under the surface (about 30 sec), then flip (tongs are good) and cook until bottom is speckled brown/black (2 minutes)
  • Flip again until other side is also brown (1-2 minutes)
  • Transfer bread to wire rack and brush lightly with melted butter. (if you want to)
  • Serve immediately, store uneaten portions in a plastic bag or aluminum foil at room temperature.
My vegetable curry with cauliflower, sweet potatoes, peas, chickpeas, and tomatoes

Friday, October 31, 2008

Wild Yeast Pain de Mie


Pain de mie is the french name for sandwich or Pullman bread. In other words, it is soft, tender bread baked in a loaf pan. I made this one with some of my wild yeast starter, adding a little instant commercial yeast to guarantee a faster rise. I am not sure is the wild yeast made a difference. The bread was not sour, and I blame this on my local bacteria.
The recipe uses 2 builds, meaning that I first combined the starter with some flour and left it overnight to build flavor, and then added it to the main dough.

Ingredients:

The night before:
  • 4 oz milk (11o g)
  • 12 oz starter (340 g)
  • 4 oz whole wheat flour (110 g) [You can use bread flour here, but I prefer the rustic appearance gained by using some whole wheat]
Mix everything together and leave out for about 2 hours (until it doubles in volume. Then, refrigerate it overnight.

The next day:

Take the re-ferment out of the refrigerator 1 hour before making the dough.

Add:
  • 3.5-4 oz Bread Flour (110 g) [The amount you will need depends on the moistness of the starter]
  • 1 tsp salt
  • 1/4 tsp instant /Fast acting yeast
  • 2 tbsp oil or melted butter
  • 1 tbsp honey [use the same spoon as the oil to create a slick surface. It will be easier to scrape the honey out of the spoon]
  • 1/2-1 cup water [the dough should be soft and slightly sticky, but easy to knead]
Mix well and let rest 10 minutes. Knead for 10 minutes by hand, or in a mixer for 5 minutes. Form into a ball and spray the dough with oil and let proof (rise) for about 2 hours. The dough should almost double.
Degas the dough and form into a loaf either by rolling the dough into a cylinder or another method of your choice.
Place loaf into an oiled loaf pan (small) and ferment (let rise) for another 2.5 hours.
Make a slit at the top of the loaf to prevent cracks and bake for 30-45 minutes at 350F. The loaf is done when its center reaches 195F.
Cool for at least 30 minutes before slicing because the center is still cooking.

This bread is delicious fresh and goes especially well with cheese.

Friday, August 22, 2008

My Wild Yeast Adventures! Part One: Breeding a Seed Culture

Since I have been making bread a lot lately, I decided a few weeks ago to take it a step further and make sourdough bread. So, on Tuesday of last week (August 12), I followed the instructions in The Bread Baker's Apprentice by Peter Reinhart as best as I could to start what he calls a seed culture. Unfortunately I was unable to find the rye flour he called for at the supermarket. Instead, I made a weird combination of flours hoping things would even themselves out.

So, day 1: 1/2 c bread flour, 1/4 c whole wheat flour, 1/4 c buckwheat flour, and 1/2 c water.
I combined them all in a bowl, covered it with plastic wrap, and left it on the counter for about 24 hours.
The next day, I went to see my bowl of goop and noticed something spectacular. There were little bubbles in the culture! I had caught some yeast! This time I followed the exact instructions in my wonderful bread book, meaning that I uncovered it and added flour and water. I then stirred it all up and put it into a tall, vertical plastic container to be able to track the growth of my culture easily.

Day 2: Add 1 cup bread or high-gluten flour (which has more gluten and is much better for this than all-purpose flour) and 1/2 water. The dough was more viscous after the addition.
So, I put the refreshed culture into the plastic container at 2 pm. Three hours later it had more than doubled in size, so I decided to mark the height with a piece of tape. However, before marking it I made the mistake of tapping the side of the container, causing the culture to partially collapse. I marked at the lower level. The next morning I got up to see if it had revived itself, but instead of regaining height it had fallen down to the original level. I was confused and disappointed...
The first picture below is right before the collapse, the second is the next morning. The chronological order of the markings is 2pm, then 5pm, and finally 8am.


I was dispirited by this result, but I decided to continue. When I opened the container the smell of overripe papaya filled my nose. How strange... I threw away half the culture as was instructed in the book, and added some more flour and water.
Day 3: Remove half of the culture (throw away or give to a friend) and add 1 cup of high gluten or bread flour, and 1/2 cup of water. Once again, I poured the mixture into the plastic container, marked the level, and hoped.

24 hours later, on day four, I went to check on my cultivation. There was no rise, and it seemed to have separated into 2 layers, with dark on the top and light on the bottom. This was too much, I couldn't handle it anymore. I gave up. I made plans to throw away, but I never got around too because I was busy. The container just stayed on my counter looking horrible and got worse as the days went by.

Then Wednesday, about a week later, I noticed the culture looked normal again! There were big bubbles all over the surface, and it had risen a bit. I decided to continue my cultivation.

Day 9: I measured the volume of culture I had, 1 1/8 cup. Then I added the usual 1 cup of high-gluten/bread flour and 1/2 cup of water and mixed. I left it to ferment in the bowl for 24 hours while I gave the plastic container a good wash.

The next day it had risen some, so I removed about half (not an easy feat) and added flour and water. Because I was tired of dealing with liquid culture, I decided to add half the water asked for.
Day 10: Remove half and add 1 cup high gluten/bread flour, add 1/4 water. Stir well and let rest 24 hours.


Today (day 11) I saw a nice rise in the culture, about doubled. This means that I get to go to the next level and make what my book calls Barm, which is just a more diluted way of storing and cultivating the wild yeast and its flavorful bacteria. I will address Barm in the next post.

So, since my way of catching yeast was kind of random and full of guesswork, I will also give you the method from the book The Bread Baker's Apprentice by Peter Reinhart. This book is currently my favorite book about bread. I have read at least three times in a few months.

Day 1: Combine 1 cup rye flour and 1 cup water. Let rest at room temperature about 24 hours.

Day 2: Dough will not have risen much. Add 1 cup high-gluten/bread flour and 1/2 cup water to rye mixture. Let rest at room temperature about 24 hours.

Day 3: Dough should have risen some, about 50%. Regardless, discard half of dough. Add 1 cup high-gluten/bread flour and 1/2 cup water to dough. Let rest at room temperature about 24 hours.

Day 4: Wait until dough has at least doubled in volume, more is better. Make barm as will be described in next post.

Have fun! Catch Yeast!

Tuesday, May 27, 2008

Revision of the Baked Sandwich Recipe


While making the Baked Sandwich for the second time, I decided to skip the second rise to see the outcome. Well, the result is that my sandwich was easier to handle and stretch out to form the sandwich, and it ended up being twice as high as the original version!
The second rise is unnecessary and actually bad for this recipe, so I have changed the main post accordingly.

The higher rise may be because the first time I made this sandwich, I let the dough rise in a oven that was too hot, but the dough rose so much this time with only one hour to rise that the second rise would be redundant.

In this sandwich I added cheese, and in the photo you can see it leaked a little.

The Recipe is here.